
How to Weld Aluminum with a MIG Welder: Spool Gun vs Push-Pull
How to MIG weld aluminum: why soft wire jams, spool gun vs push-pull, machine and gas settings, and the ventilation and ozone precautions that matter.

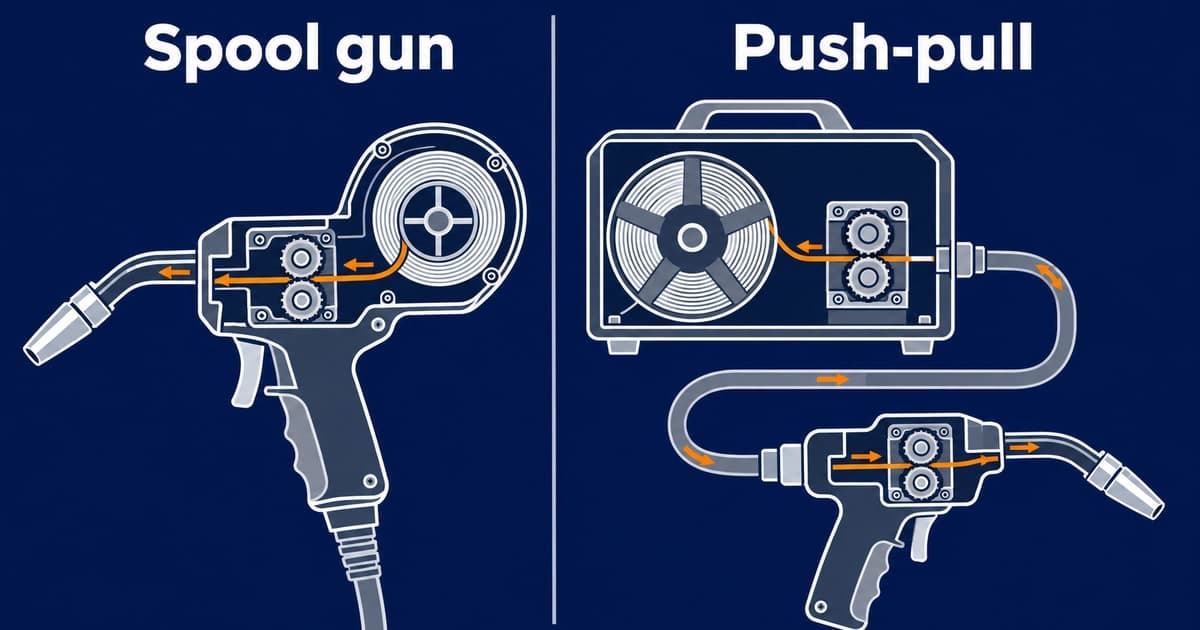
If you want to know how to MIG weld aluminum, the first thing to understand is that aluminum wire is soft. A standard steel setup feeds stiff wire through a steel liner without trouble, but aluminum wire bends, binds and jams when it travels through a long gun cable. The result is an erratic arc and a lot of frustration. The fix is a different feed arrangement, not a different technique.
This guide explains the two common answers to that problem, the spool gun and the push-pull gun, and what else you need before you strike an arc. It also covers the safety points that are easy to overlook with aluminum, including fume and ozone.
Why Aluminum Wire Needs Special Handling
Aluminum is a soft electrode material. Steel wire has enough stiffness to push through a liner for a few feet of cable, but aluminum wire can kink and wedge inside the liner. The longer the cable between the wire feeder and the gun, the more chance there is for a jam.
Standard MIG setups use a steel liner for ferrous wire. For aluminum, the liner needs to be changed to a plastic type, and the drive rollers must match the wire diameter and groove type. Those changes help, but on a long cable they often are not enough on their own. That is why aluminum MIG usually calls for one of two feed systems.
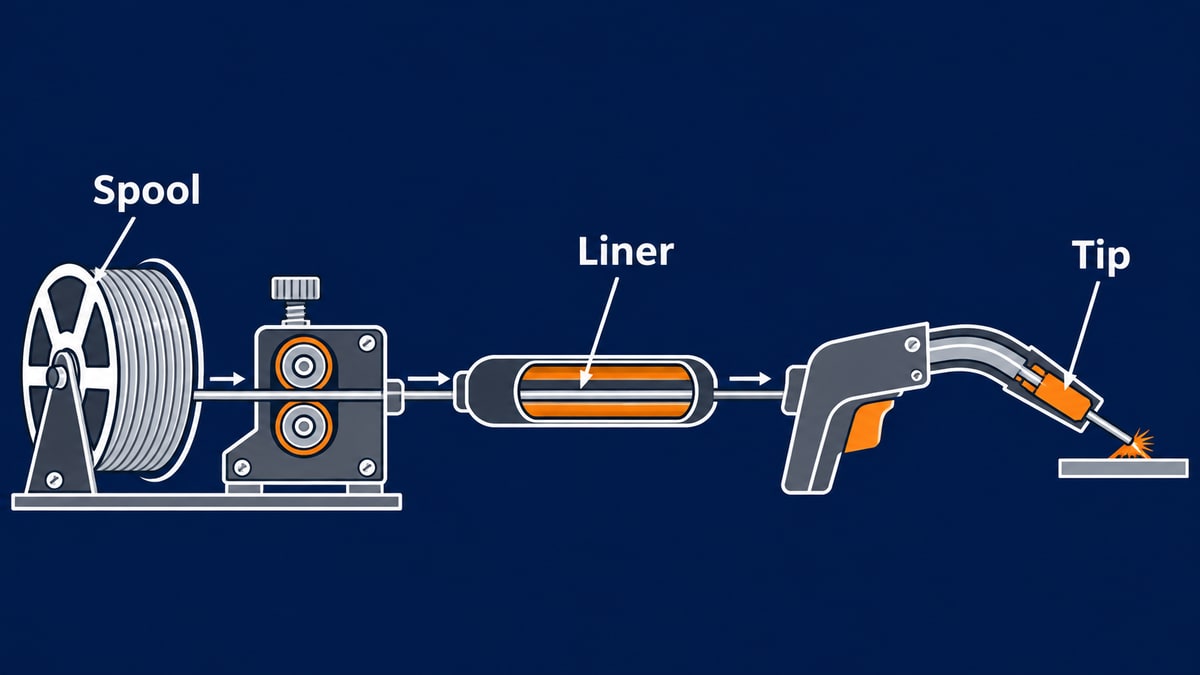
Figure 1: The wire path from spool to contact tip. Aluminum wire needs the liner and rollers matched to it, and the longer this path, the more chance of a jam.
For background on the process itself, what is MIGMAG welding covers the basics of the wire, gas and gun arrangement before you add aluminum to the picture.
The Spool Gun Option
A spool gun carries a small wire reel mounted on the gun handle, close to the welder. Because the wire does not travel through a long cable, the risk of jamming falls sharply. The cable between the gun and the machine carries only the power and the gas, which also makes the torch easier to move around.
The trade-off is the size of the spool. A small reel holds less wire, so you change spools more often, and the gun is heavier in the hand. For short runs, repairs and light fabrication, a spool gun is often the simplest answer. Shops that weld aluminum every day often move to the longer-cable option.
The Push-Pull Option
A push-pull gun keeps the wire reel inside the machine. A second pair of small drive rollers sits in the gun handle and pulls the wire through the cable, while the drive rollers in the machine push it. The combined action helps prevent the wire from jamming over longer cables.
Push-pull systems suit longer cable runs and heavier work, because the wire supply stays on the machine and the gun can be lighter. The drawback is equipment cost and complexity. You need a compatible machine and a gun designed for the system, so check that your welder supports push-pull before you buy one.
Choosing Between Them
For a beginner or someone doing occasional aluminum work, the spool gun is usually the easier place to start. It needs fewer setup changes and works with a standard welder once the gun is connected and the feed rollers are set correctly. The short wire path also makes it easier to spot the source of a problem.
For a shop that welds aluminum regularly, push-pull can be the better long-term choice, particularly where cable length matters. The right answer depends on how far the gun needs to reach, how often you change wire, and the budget for equipment. Whichever you choose, use the wire feed rollers and liner recommended for the aluminum wire diameter.
Machine and Gas Setup
Set up the machine for constant voltage operation, and match voltage and wire feed speed to the wire diameter and material thickness. Make test beads on scrap of the same alloy and thickness before you weld the real part.
Use 100 percent argon as the shielding gas for aluminum. Aluminum needs a clean, inert atmosphere, so do not substitute mixtures designed for steel. Check the gas flow for the nozzle and conditions, and keep the cylinder, regulator and hoses sealed.
Before welding, clean the joint. Remove the oxide layer with a dedicated stainless wire brush and wipe the surface with acetone to remove grease and moisture. Aluminum's oxide layer melts at a higher temperature than the base metal, so it must be broken up before the weld can fuse properly.
Technique for Beginners
Push the torch rather than dragging it when welding aluminum with MIG. Keep the travel speed steady, because aluminum conducts heat quickly and a slow pass tends to burn through. Watch the weld pool closely. Aluminum pools are bright and can be hard to read at first, but a stable, flowing pool indicates the right heat.
Keep the contact tip at a consistent distance from the work, and watch for changes in the arc as the wire feeds. A feed problem often shows up as an unsteady arc or a burst of wire, so check the feed before adjusting the power.
Safety: Fume, Ozone and Ventilation
Aluminum welding produces fumes that include ozone and other compounds. Good ventilation is essential. Use local exhaust where you can, keep your head out of the plume, and do not weld in a closed space without airflow. Ozone and fume exposure should be taken seriously even on short jobs.
Wear the protective equipment for the process: a helmet with the correct shade, gloves, and flame-resistant clothing. Aluminum projects often involve thin sheet or tubing, so keep flammable materials away from the work area.
For a wider view of controlling fume and gases during welding, the OSHA fact sheet on controlling hazardous fume and gases is a good reference to read before you start a regular aluminum job.
A Checklist Before You Strike an Arc
Before the first bead, confirm that the basics are in place. The list is short, but skipping any one of these items is a common reason for poor aluminum welds:
- Machine: A welder with a constant voltage output and a spool gun or push-pull system matched to the wire.
- Gas: A cylinder of 100 percent argon with the regulator and flow set for the nozzle.
- Material: The joint is clean, with the oxide layer broken up by a dedicated stainless wire brush and the surface wiped with acetone.
- Feed: The liner is plastic, the drive rollers match the wire diameter and groove, and the wire runs freely from spool to tip.
- Safety: A helmet with the correct shade, gloves, flame-resistant clothing, and ventilation running before the arc starts.
Run through this list each time you change wire, change material or move the machine. A few minutes spent on it saves a lot of rework.
Consumables and Maintenance
Clean aluminum is essential, but so are the consumables. Use a fresh contact tip matched to the wire diameter, and check the liner and drive rollers for wear. A worn contact tip or a clogged liner causes many feed problems that look like machine faults. The MIG welding gun consumables guide covers what to keep in stock and when to replace each part.
Store aluminum wire dry and keep it clean. Wire that has picked up dirt or moisture can cause porosity and erratic feeding, and that is hard to fix once you are welding.
Common Problems and Fixes
Wire bird-nesting or jamming. Check the liner type, the drive roller groove and the contact tip size. On a long cable, consider a spool gun or push-pull system.
Burn-through on thin sheet. Increase travel speed, reduce heat in small steps, and make sure the joint is tight. Aluminum loses strength quickly as it approaches melting, so small changes matter.
Porosity. Clean the joint more thoroughly, check the gas flow and cylinder, and keep the work shielded from draughts.
Dark or sooty bead. Usually caused by contamination on the base metal or wire. Clean again and check the wire storage.
Unsteady arc. Check the feed rollers, the contact tip wear and the stickout. Adjust voltage and wire speed together rather than one at a time.
A Note on TIG for Aluminum
MIG is not the only way to weld aluminum. TIG with AC can give more control on thin material and is often preferred for precise work. The settings for TIG aluminum, particularly the AC balance, are different from MIG, so the choice depends on the job. For TIG-specific settings, the aluminum TIG welding AC balance guide explains how the balance control affects cleaning and penetration.
Putting It All Together
To MIG weld aluminum well, solve the feed problem first. A spool gun or push-pull system keeps the soft wire moving smoothly, and a plastic liner and matched rollers do the rest. Clean the joint thoroughly, use 100 percent argon, and make test beads on scrap before you weld the real part.
Choose the feed system for your work: a spool gun for shorter runs and beginners, push-pull for longer cables and heavier production. Keep ventilation in mind from the first weld, because ozone and fume are part of aluminum work. With the right setup and steady practice, MIG aluminum becomes a repeatable process.
Frequently asked questions
Can I MIG weld aluminum with a standard MIG welder?
Often you need additional equipment. A standard setup feeds steel wire well, but aluminum wire needs a plastic liner, matched drive rollers, and usually a spool gun or push-pull system to avoid jamming on longer cables.
What is the difference between a spool gun and a push-pull gun?
A spool gun carries a small wire reel on the gun handle close to the welder. A push-pull gun keeps the reel in the machine and uses a second set of drive rollers in the gun handle to pull the wire through a longer cable.
What shielding gas should I use for aluminum MIG?
Use 100 percent argon. Aluminum needs a clean, inert atmosphere, so mixtures designed for steel are not suitable.
Why does aluminum wire jam so easily?
Aluminum wire is soft, so it can kink and wedge inside the liner, especially over a long cable. Plastic liners, matched rollers and a shorter wire path reduce the problem.
Do I need to clean aluminum before welding?
Yes. Remove the oxide layer with a dedicated stainless wire brush and wipe the surface with acetone. The oxide melts at a higher temperature than the base metal and must be broken up for good fusion.
Is aluminum welding fume dangerous?
It can be. Aluminum welding can produce ozone and other fumes, so use good ventilation or local exhaust, keep your head out of the plume, and follow safety guidance for the process.
Should I push or drag the torch on aluminum?
Push the torch when MIG welding aluminum, keeping the travel speed steady. Dragging tends to increase heat concentration and burn-through risk on aluminum.
Is MIG or TIG better for aluminum?
Both work. MIG is faster and often easier for beginners and thicker material. TIG with AC gives more control on thin material and precise work, but it demands more skill.
References
- How to Weld Aluminum: Techniques, Tools, and Safety Tips - American Welding Society, Welding Digest, June 2025.
- 10.2 GMAW Equipment and Setup - Introduction to Welding, OpenWA, accessed 2026-11-17.
- Controlling Hazardous Fume and Gases during Welding (OSHA FS-3647) - Occupational Safety and Health Administration, accessed 2026-11-17. Title and subject confirmed from search results.